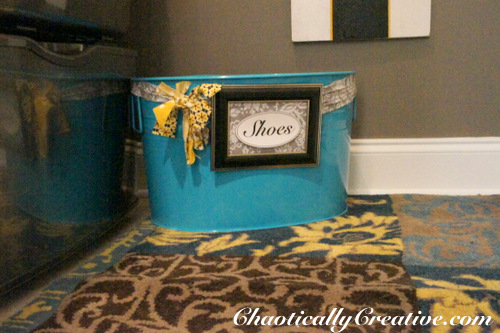
Here’s a super quick and easy organizing tip and DIY. We needed a shoe basket to keep our shoes in. We have a rule in our house that my older son has to change out of his “school” shoes and into his “play” shoes before going outside to play. This is where the swap happens.
Importance of Labels
Creating labels for children promotes independence and literacy. When they clearly know where things can be found and where things can be put away they are much more apt to do things on their own. It’s much easier to say “Jude, go get your shoes out of the shoe bucket.” Then to just say, “Go find your shoes.” and have him wander aimlessly around the house.
Here’s how I can teach him. I will show him on the bucket that it says shoes and then show him that there are shoes in the bucket. This helps him form that connection between objects and words as well as the association between an object and it’s place. Not only am I introducing him to pre-reading skills, but I am also teaching him important organizational and self help skills.
Once he knows where he can find something, even at the age of 2, he can get it all by himself. Self help skills are the #1 most important skills children need before entering school. Remember teachers can not do everything for a class of 25. So, we have to prepare our little ones at home even though sometimes we all know it’s easier for us to just do it ourselves.
Label DIY
You can use any type of large bucket or basket. This basket was from K-mart a few years ago from the Martha Stewart line. Here’s how I made this label.
- Take a wooden frame and remove the glass.
- Take out the back piece of the frame and place this part on a piece of fabric
- Trace on fabric and cut out
- Using spray adhesive, glue fabric to the frame piece
- Insert piece back into the frame
- On your computer design your label and print or if you have gorgeous writing design your own by hand
- Take some contact paper or lamination and cover your label (if your frame has plastic in it and not glass you can skip this step)
- After you have protected your label with contact paper use hot glue to adhere it into the frame onto the fabric (if your frame came with a plastic insert and not glass you may insert that piece now just use a small dab of hot glue or else your plastic will look lumpy)
- Take two scrap pieces of fabric and measure them making sure they will wrap around your container and you have enough left to tie them together
- Once you have figured out the length you will need, take a staple gun and staple the pieces of scrap fabric to the back of the frame several times (this is why you need a wooden frame)
- Take the two ends and wrap the whole piece around the container and tie it tightly in the back
- I took about ten 3″ pieces of scrap fabric and tied them next to the frame for an accent, you can get even more creative if you want to. Have fun and Be Creative!
